

Pirate Living Room Page Menu: Main Art Lighting Entertainment Center Shelves Pirate Models
Pirate Livingroom: Lamps and Lighting
I'm not sure where I got the idea (yet again), but I decided somewhere along the way that if a pirate had had the option to have electric lights, he (or she) would have chosen to use Mica for the shades. Make sense? (Well, who cares?) Mica is a pretty expensive material to get lamp shades made from for some reason, so I was overjoyed to find a series of lamps with mica shades on clearance at Lowes. It was but the swipe of a credit card and I had three mica lampshades (along with three lampshade-less lamps - one of which I have actually found a use for) for under $75 total.
Table and Floor Lamps
|
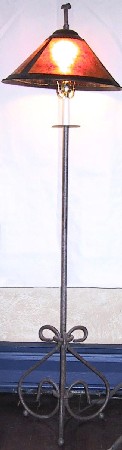
This floor lamp at left was also purchased from Lowes. I happened to see
it when I was looking around (There's nothing quite like walking around a store aimlessly to spur creativity.) It came with a hideous yellow paper lampshade which I transplanted with a mica shade for
a period-appropriate floor lamp. OK, there's no such thing, but it works..
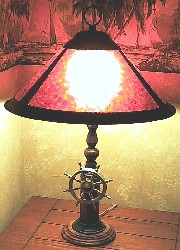
The two table lamps are the ship's wheel lamp (seen above left) and what I call the candle lamp (seen above center and at right). I've owned the ship's wheel lamp since I was 9 or 10, so it was sort of a cherished piratey possession. It fit the "themes based on my personal history" concept, so I wanted to use it. It was actually stained a very light almond sort of color to begin with, so I disassembled it, stripped the varnish and stain off (this room involved a lot of paint stripping) and re-stained it with the color used on the floor. I painted most of the original brass fittings black and then rubbed them so bits of brass would show through. I was going to paint the wheel, but ultimately decided it would best left as is. |
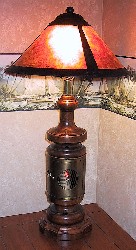
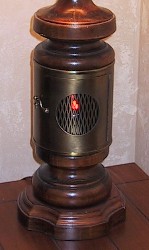
The candle table lamp in the center and left photos was something I found on clearance at a furniture store. (A lot of stuff I found was on clearance. I wonder if the universe is trying to send me a message? Nah....) This is one of those things that would look absolutely silly in most places - kind of like the "stupid Roy Rogers wagon wheel table" from the movie When Harry Met Sally. Since I'm a bachelor, I can make such absurd purchases without giving them a second thought.. The mica shade was requisite and quickly replaced the gi-normous white thing that came with it. As you can (sort of) see in the right-most photo above, the middle section has a sort of brass piece with a small door held by a very pirate-ish looking hasp. The hasp actually works and the door actually opens so that you can access a flicker bulb in there. Pretty cool, eh? The switch allows you to turn one or the other or both of the lights on, so you can set it so only the flicker bulb is running for "mood lighting." (The mood is "painful" because the flicker bulb illuminates nearly nothing behind that cool brass screen door and you'll probably stub your toe on all my cool pirate end-tables if you try to move about the room.)
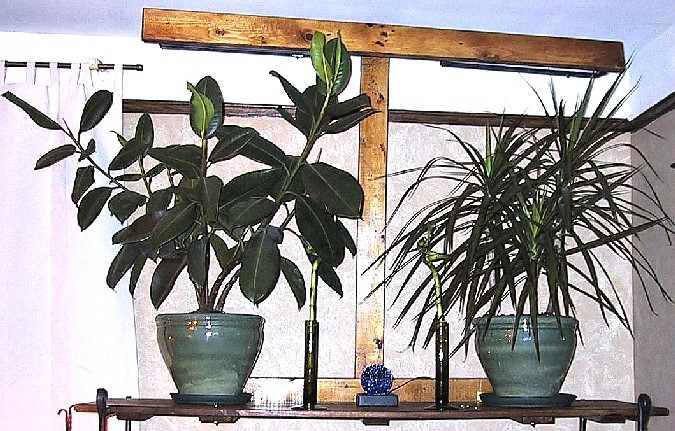
The Plant Light
 The plant light was really something of an afterthought. This is because
the plants were really something of an afterthought. (See my
Plank Shelves Page for more on
that.) The place where the plants live in the living room is quite dark. I didn't
want to be responsible for the deaths of tropical plants, so I conceived this
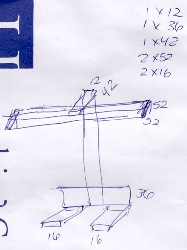
thing. First, I measured the space, then I sketched it out, literally on the
back of an envelope (seen at left). I figured the wood dims, bought the wood
and simply cut it up to size.
The plant light was really something of an afterthought. This is because
the plants were really something of an afterthought. (See my
Plank Shelves Page for more on
that.) The place where the plants live in the living room is quite dark. I didn't
want to be responsible for the deaths of tropical plants, so I conceived this
thing. First, I measured the space, then I sketched it out, literally on the
back of an envelope (seen at left). I figured the wood dims, bought the wood
and simply cut it up to size.
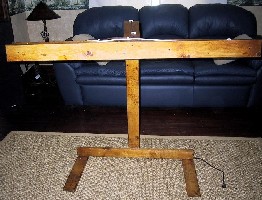
 It all sounds so simple, doesn't it? It wasn't. I won't bore you with the
number of times I stained those pieces of wood to get them right. The design
wasn't real assembly friendly, either. In the end, it all came together,
though. It only took me about four times as long to finish as I expected.
(Then again, try and name for me a home project that doesn't...)
It all sounds so simple, doesn't it? It wasn't. I won't bore you with the
number of times I stained those pieces of wood to get them right. The design
wasn't real assembly friendly, either. In the end, it all came together,
though. It only took me about four times as long to finish as I expected.
(Then again, try and name for me a home project that doesn't...)
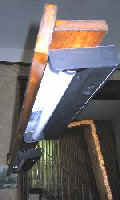
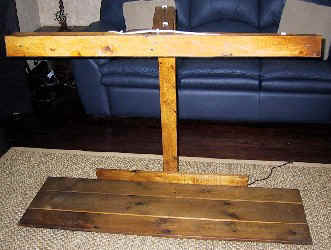
At right you can see the lamps poised behind the angled wood "shade.". There are two standard, cheap T8-15 fluorescent fixtures painted matte black. I installed aquarium/plant growth bulbs in them and hooked the whole mess up to a timer. Now the plants get their daily allotment of light at around the right time of day. Below are some shots of the lamp with the shelf (pre-assembled at left and assembled and installed at right). It worked out quite well, with the fixture being about 3 inches below the ceiling. (Measure twice, cut once?)
|
|
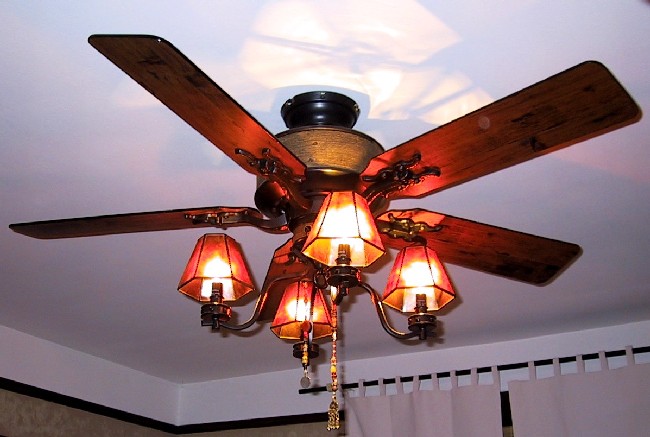
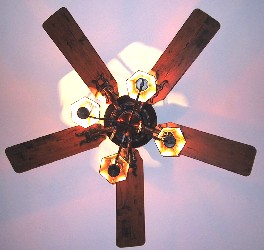
A Pirate's Own Ceiling Fan
|
I never intended to put a ceiling fan into this room. I figured I would just put several lamps in and be done with it. Well, as lovely as those mica shades are, they sure shade the light well. I realized this when the wallpaper borders were being installed. (It's a good thing I have a halogen work light.) So it became apparent that a ceiling lamp would really be nice. I also knew from experience that the room got pretty warm during summer, even with the window air conditioner running at full blast in the next room. So I thought a ceiling fan with lights would do the trick. Actually, I had been leaning towards this anyhow, because Lowe's had this really cool fan called the Adirondack Bittany Bronze Fan that fit the need. (I can't resist a product that really fits what I'm doing. It happens so seldom.)
So I bought the fan. The fan was relatively expensive, but it was cheap in comparison to the time and effort it took to install. This had nothing whatsoever to do with the actual fan and everything to do with running wires and switches through an almost 100-year old house without damaging the plaster walls. I won't go into details, but as a hint (and a warning), it involved drilling holes in the walls, running wire through the basement and the ceiling, removing several moldings unexpectedly, making a new hole in the floor of the upstairs bathroom and generally scratching my arms all up reaching into small holes trying to run fish tape and Romex. It was a bear.
|
|
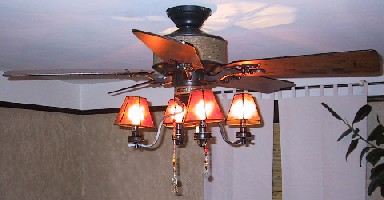
Now, the fan itself was close, but not exactly what I wanted. It came with these black metal bears and pine trees ring thing around the top section (tan colored above fan blades) and rawhide laced leathery-looking lampshades. (See image below right for a view of that.) No self-respecting pirate would have that on his fan, so they had to go. Back to mica... Fortunately, I had discovered a really cool hexagon shaped mica shade for a pretty reasonable price at the on-line site lampsplus.com. It didn't make the fan any cheaper overall, but it added the right touch.

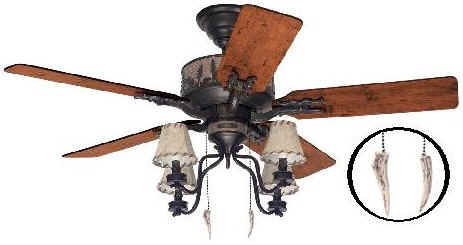 The final detail on the fan were the pull cords. The original fan came
with these cool teeth things (seen at right), but they weren't quite right. so I
made up some bead dangles like Captain Jack wore in the Pirates of the
Caribbean movies with the help of a girl in a local bead shop. (I am
sometimes amazed at
the weird creative ventures I get myself involved in.) My version with the
Kuchi dangles (in the above left pic) wasn't so hot, so I picked that one up
off eBay that was far more accurate. It turns out there is this whole little
cottage industry trying to replicate Captain Jack's beads (and nearly always
missing the mark from what I've seen. eBay is definitely your best bet). With
my Capt. J bead strand, I received a copy of the shorter one (on the right).
Since I liked my strand, the eBay one wound up on the Captain Jack skull wall art.
You can find out more about it here.
The final detail on the fan were the pull cords. The original fan came
with these cool teeth things (seen at right), but they weren't quite right. so I
made up some bead dangles like Captain Jack wore in the Pirates of the
Caribbean movies with the help of a girl in a local bead shop. (I am
sometimes amazed at
the weird creative ventures I get myself involved in.) My version with the
Kuchi dangles (in the above left pic) wasn't so hot, so I picked that one up
off eBay that was far more accurate. It turns out there is this whole little
cottage industry trying to replicate Captain Jack's beads (and nearly always
missing the mark from what I've seen. eBay is definitely your best bet). With
my Capt. J bead strand, I received a copy of the shorter one (on the right).
Since I liked my strand, the eBay one wound up on the Captain Jack skull wall art.
You can find out more about it here.
Pirate Living Room Page Menu: Main Art Lighting Entertainment Center Shelves Pirate Models
Main Page • Tools & Procedures • Miscellanea • About the Author • Facebook Page
All original content copyright M. Kehoe • 2003-