
Mercury Ship in a Bottle: 1 2 3 Next>>
Mercury Ship in a Bottle by Daniel Siemens, Page 2
Building the Mercury Masts, Sails and Spars
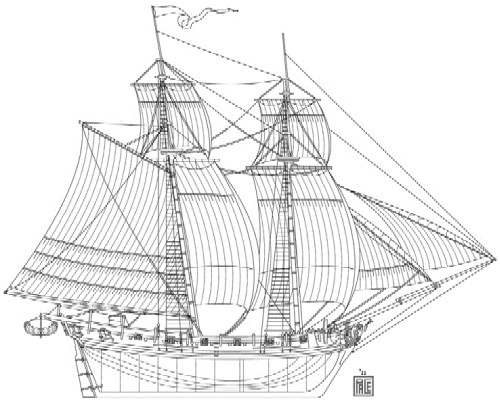
Artist: William Pace - The Mercury Draught Showing the Sail Plan
Most of the work on the body of the ship was now complete, although Daniel had not yet put the deck stanchions [posts on outer edge of the deck] on. So he added them, painting them red to match the other details on the ship.
Each stanchion was shown with a deck gun on top of it in the original plans. (These give the Mercury added fire-power and make her look more threatening to her targets.) However, Daniel decided not to add them, explaining that "I added them to a ship once and they went highly unnoticed. Also I had trouble with them falling off and I didn't want to deal with the trouble trying to keep twelve swivel guns in place while the ship was going through a bottle neck."
It was now time to give the ship the ability to sail, even if it was only in it's tiny, bottle-sized environment. First Daniel installed the two masts. "I stepped them [raised them] as they are in the plans and added the platforms. This was done in a similar way to a lot of small details on this ship by cutting them out the plans and staining them. The masts are made from bamboo skewers. Bamboo is the best when it comes to spars and masts since it stays strong even while incredibly thin."
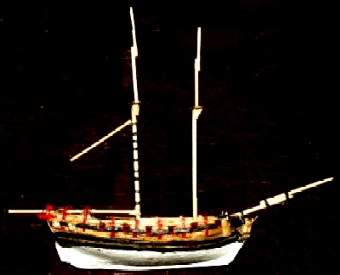 Photo: Daniel Siemens - Addition of the Masts and Some Spars |
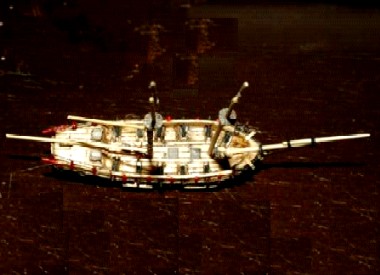 Photo: Daniel Siemens -Top View of The Masts and Spars. |
Next
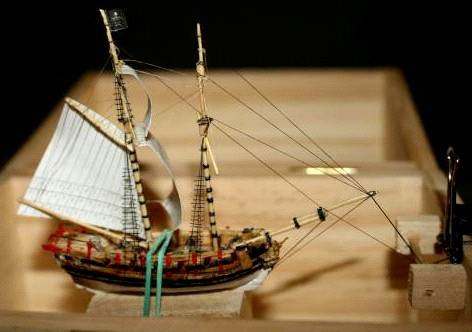
Photo: Daniel Siemens - The Gaff Boom Sail or Spanker on the Mercury
came the sails and their rigging (ropes for you land lubbers, or lines for you sailors). As Daniel explained it, "There is a lot that went into the rigging." He was clearly understanding the thing. He told me he used fly-tying thread since it is strong and doesn't stretch very much.
The first sail was ready to be raised on the Mercury. You would think it would be at the front. (Well, you would if you were me and you hadn't already seen that picture at left.) You would be wrong. (So would I.) Daniel: "I started with the gaff and boom sail in the stern, often called the spanker."
"In most Ships in a Bottle (SIB) a hole is drilled through the spars [wooden vertical pieces extending from the mast to hold sails] to allow the rigging to pass through."
"At this scale drilling a hole would be difficult and compromise the strength of the spars. Instead I used a method called thread blocks. A piece of string is tied around a needle and the knot glued. After the glue dries the thread is taken off the needle. It creates a very small thread loop that can be tied into place on any mast or spar. The line runs smoothly through the loop and can be loosened and tightened as needed." If you hadn't thought Daniel's attention to detail was painstaking before, you have surely revised that opinion by now.
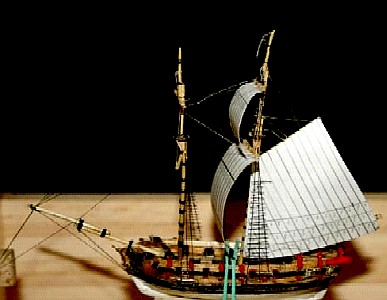
Photo: Daniel Siemens - The Aft Mast Sails and Rigging from the Side
"I used a lot of thread blocks on the rigging to hold up the gaff boom. The spars are tied to the masts and the lines glued in place so they can move back and forth on the line but not up and down the mast. I did drill a few holes in the wider parts of the mast to keep certain spars in place. Mostly whereever I felt the mast could handle the hole."
"I used thread blocks in the bow as well for the forward rigging to run out of the bottle. This is used to pull the masts into place later. On the back stays I drilled very small holes in the chain plates [plates on the
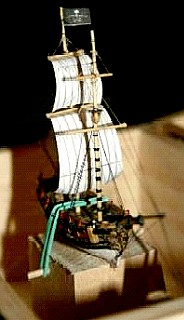
Photo: Daniel Siemens
Mercury Aft Mast Sails, Front
deck of a ship used to hold the masts up]. The back stays are actually one continuous line on a single mast. They run from one chainplate through the mast to the other chainplate and back. This allows a lot of control for equally tightening the back stays. With one line all of the back stay lines can be tightened by pulling the line and moving the mast back and forth. The back stays on a SIB are important in controlling the rake or angle of the mast as compared to the deck."
"You'll notice the aft mast leans a little more towards the rear of the ship. This was the case on the plans and was replicated by controlling the tightness of the back stays. Once the back stays were set and glued down I added the ratlines [rope tied between shrouds to form ladders] by gluing thread to the back stays."
"The last thing
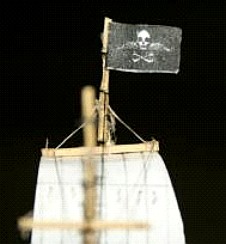
Photo: Daniel Siemens
The Aft Mast Mercury Flag Detail
to go over with these photos is the flag. The plans called for a pennant. Pennants hold more significance to military ships. The longer the pennant the longer the longer the ship has sailed. That could be adapted to a pirate ship but I ultimately decided that if this were the ship of the Mercury crewe it should bear the flag of the Mercury crewe."
"I put the flag in Photoshop and copied it so that when printed I could fold it in half. When putting a flag on ship it's important to consider the wind direction. It's more natural that the flag follow the wind direction."
You may wonder at all Daniel's concern for getting the rigging set up just so. Daniel explained that there was a very particular reason for this. "The rigging is the secret to getting the ship in the bottle. Just like a real ship the back stays hold the mast back while the fore stays pull it forward. Unlike a real ship, the ship in a bottle's mast doesn't go all the way to the keel [bottom of the ship]. It sits in a shallow hole on the deck. When the fore stays are loosened it allows the masts to fold back and lay flush with the hull."
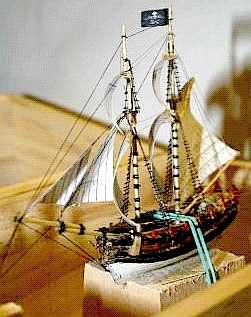
Photo: Daniel Siemens
The Mercury Fore Mast Sails Angled View
With the aft mast sails complete, Daniel proceeded to add the sails and rigging to the fore mast. While getting ready to do this, he noticed a problem with the sails that were already installed. I'll let him explain.
"I wasn't originally going to add the rigging that controls the spars or running rigging. [Running rigging is used to pull the sails allowing control of the direction of a ship while it is sailing.] Running rigging is a lot more work and if not done well can detract from the ship. Since the eye fills in what's not there, a lot of SIB builders leave the running rigging off. I decided to include it following a slight mistake."
"I glued on the spanker with a port tack - meaning the wind was blowing towards the port side. My main sails naturally fell towards the starboard side. If I left off the running rigging I would end up with the sails that followed two different wind directions. In order to correct this I put on the running rigging to brace the spars on a port tack. I ran the running rigging out the sides of the ship and the out the bottle. This made it possible to tighten it while the ship was in the bottle."
"The sails are made of paper. I curled them by pulling them between my thumb and a pen. This creates the wind filled look of the sails."
With that, the Mercury was complete! But there were two other small details to complete.
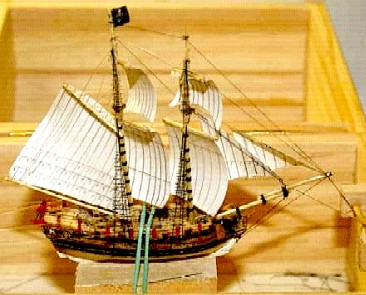 Photo: Daniel Siemens - The Starboard View of the Mercury with Sails |
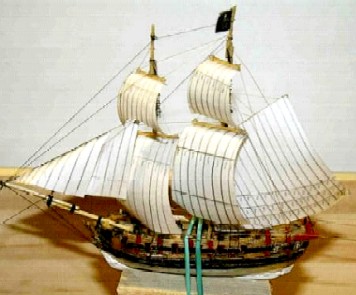 Photo: Daniel Siemens -The Port View of the Mercury with Sails |
Building the Gullah Launch and Jollywatt Dart
Artist: William Pace
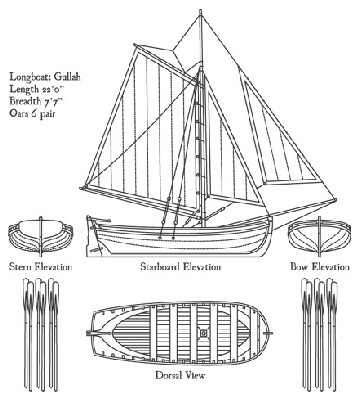
The Gullah Launch/Longboat Plans and Details
The last thing required to complete the building of the Mercury was the building of the two smaller boats used to service the ship. The Gullah is a launch, which is the largest boat a ship would have on board. It would be used to transport people and set the anchors of the ship. The smaller boat is the
Artist: William Pace
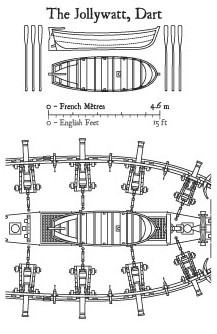
The Mercury Jollywatt Dart Plans
Jollywatt, a dart. I had specifically asked Daniel to have the Gullah trailing behind the ship because I liked the way that looked. The dart was to be sitting on the deck of the ship as it was shown on the draughts or prints that William had made.
"I built the smaller boat using a match stick. The details for this method can be found on my blog. The bigger of the two is being towed behind and is actually out of paper. For this I cut out a wood version of the boat. Rather then carve out the inside, which would be difficult considering its' size, I coated the wood plug in nail polish and wax. I then glued paper planking, stained with a wood stain over the plug and pulled it off once it had dried. I then glued in additional pieces of paper to create the seats."
This completed the building of the ship and her boats. Now it had to go into the bottle.
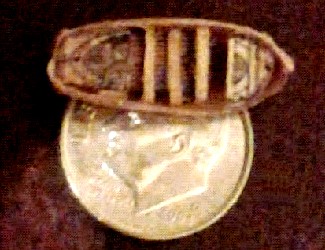 Photo: Daniel Siemens - The Gullah Launch |
 Photo: Daniel Siemens -The Jollywatt Dart on the Deck of the Mercury |
Mercury Ship in a Bottle: 1 2 3 Next>>
Main Page • Tools & Procedures • Miscellanea • About the Author • Facebook Page
All original content copyright M. Kehoe • 2003-